Shimmer Spray Recipe


I like to alter paper. Many of my projects end up being mixed media even if I don't plan that when I start out. When things are not turning out how I hoped, or like, I try to follow the advice of the well known designers and just keep going. Often, I find myself grabbing the glimmer mist. Being the budget crafters that I am, I always look to pick these beauties up at a discount. No one wants to pay $4.99 for a 2 oz bottle that you will run-through in a month if you are shimmer crazy like me.  You can often find them at Tuesday Morning for half price, but that is hit or miss and recently, they have been carrying multipacks that include colors that I either have or just do not care for. DIY to the rescue!  Below is my Dollar Store recipe that I have made in many colors with great success. 


$10 worth of ingredients from Dollar Tree will create 6 colors off glimmer with enough left over to make 
a 2nd batch.  If you are not sure of how much you will use of any specific color, use less mica and alcohol. 

Ingredients:                                               
Alcohol *see notes
Bottled water *see notes
Mica - L.A. Colors eyeshadow
Liquid hairspray
Spray bottle *see notes
Glycerine **optional / drugstore
Acrylic paint **optional
*NOTES:  use 70% alcohol undiluted or 90% alcohol 
with a 60 alcohol to 40 water ratio. Dollar Tree Alcohol 
is 50% concentrate, DO NOT ADD WATER! 


Eyeshadow - Snow White for pearl on any surface. Sunshine = gold. Play with colors to find combinations that you like.  Use any shimmer eyeshadow with mica as 1st ingredient.  


Spray bottles ... You can buy travel bottle set OR a body spray bottle for same price. Depends on how much you want to make. Dump the body spray and rinse; do not wash with soap!  It may still smell so pick something you like. Trim the tube at an angle so that it is not touching bottom of bottle.


INSTRUCTIONS:
  • Remove eyeshadow brush and tap mica into bottom of the lid. Be patient, this takes a couple of minutes. Measure 1/4tsp mica and add to travel size bottle. The Dollar Tree bottles are 2.7oz. 
  • Add 1 TBSP liquid hairspray, swirl to combine. This is a binder and keeps the mica from flaking off when dry. 
  • Add alcohol until bottle is 3/4 full.
  • OPTIONAL Add 3 drops glycerine for travel bottle. It helps with flow but increases drying time.
  • Shake well without spray tube, use the solid cap or otherwise cover the opening. 
  • TEST on white paper. Add more mica as desired. 
  • If happy with shimmer color, add sprayer and cap. I recommend labeling with the color of eyeshadow used for future reference. 


Paint + Mica = Opaque color shimmer 
SWIRL! Do Not Shake to keep sprayer from getting clogged. Do this each time for best results. The mica will settle.     ----->>>


Pearl + White Paint


OPTIONAL 
If you want a colored spray with a pearl glimmer, add 5 drops of acrylic paint. 
This will give you an opaque base color. Use ink for translucent color.
Leave out paint or ink for shimmer only. 
The samples below were created using only mica.

Snow White adds a pearl shine to any project.  

Sunshine add Gold shimmer
Lollipop is a vibrant Pink
1/2 tsp mica was used here
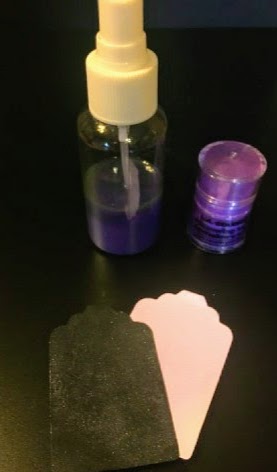
Gape Jelly adds a subtle Purple shine
Radiant is a Copper shimmer

Use mica eyeshadow to create shimmer sprays


Challenge Starts July 1st!


Making the Cut! FREE SVG Resources

I remember the infomercial like it was just yesterday!  This amazing little electronic machine I could order over the phone or pickup at Walmart if I were so lucky that they would ever have them in stock. It would cut specific images and select words in a variety of sizes up to 5 inches! Back in those days, I used die cuts regularly in my scrapbook business, for PTA signs and other school related projects. I was limited to the Ellison die library available in the school workroom or my friends super cool original Sizzix. Fast forward many years later and I now have my own original 'Big Red' Sizzix that I still use daily, and 3 Circuts! I saved and saved for that original model with the small 6 inch paper feeder, bought the the bigger Expression compete with CD rom design studio 2nd hand for a bargain, and was gifted the Explore Air by an amazing friend who loved hers so much she new that I would too. She was right, I love that thing! And the infinite possibilities the Design Space offers take projects to a whole other level. 

!Cameo and other electric diecut machine owners, read on! There are options for you as well! 

I appreciate that Cricut made it so you could link your older cartridges, since I have at least 12 years worth. And that there is an assortment of FREE SVG's in their library because I am still, after all, a crafter on a budget.  If you are using it daily and for a home based business, Access is the way to go for SVGs. As a budget crafter, I don't want to purchase every cartridge, or even every design and monthly Access, though a low price, is still not always a good option for the amount I use in any given month. So what's a crafty girl to do?

Do not despair! You will find many options available for FREE.   My favorite crafty word! 
First, we have to look to Cricut Design Space for what they have to offer. The most often overlooked option in Design space is their FREE THIS WEEK category.   Here is how to find it...
Open Design Space and click on insert image, then click categories, then on free this week. An entire set of themed images, usually from a specific cartridge in the Access library will come up. Click on the images you want to load to your mat and save to your projects. PLEASE NOTE! With recent updates, the images will be save but you can only cut them FREE of charge while they are in the FREE THIS WEEK category or you have paid for Access.  

FREE THIS WEEK  June 28, 2017  Cricut Design Space

Another great resource is MissKateCuttables offering a free design each day. You will need to set up an account, super easy, which also keeps your designs so you do not have to download them until  you are ready. The FREEBIE OF THE DAY might be an SVG, a digital paper or a font. The SVG images come with options to print instead of cut, print then cut the entire image and cut in layers. Super versatile and totally worth the 2 minutes a day to build your library. 

Check out LoveSVG.com for an assortment of FREE images and fonts for personal use. You can purchase the license very inexpensively should need that for your business. The images come as SVG, PNG, DXF and EPS.  No account registration required. They currently have a bundle with 40 hand lettered sayings.   Love this one   ------>>>

LovePaperCrafts.com has an assortment of FREE printables, digital paper, 3D projects, and SVGs. No account registration required. 

DreamingTree.com is another great source for FREE printables and SVGs. 

Of course, there is always the power of Pinterest and Google search to help find what you need if the sites above just don't 'cut it'.  Make sure to include my favorite crafty word, FREE, in your search option along with the format you hope to use; SVG, DXF, EPS or PNG to help narrow your search.  And please, save your files in your cut program for future use as many sites change availability of their cut or print files. 

Happy Crafting Y'all! 

COUPON CODES Just For You!

Hello my frugal friends! 
Today I have a little coupon code and a big deal.  This is being shared with my subscribers early as a special thanks for helping me get my blog noticed. 

My Besties is the JULY sponsor for a new monthly challenge at jenskoalatcrafts.  Sherri Baldy has provided us with a coupon code good for 50% off most items at www.MyBestiesShop.com  good for the month of July. You get it early and can use it now!  


     Type Coupon Code at Checkout 
YOURSPECIAL50


Now for the Big Deal! If you have had your eye on amazing Cricut bags, they are on sale over at www.shop.cricut.com.  The shoulder bag is perfect for laptop and other supplies and it is on super sale for $29.99.  AND... If you should happen to follow MELODYLANE melodylanedesigns or MAYMAYMADEIT  maymaymadeit   you already have a coupon code for an additional 15% off and FREE Shipping. Circle and Access members get to use their 10% off as well. You can get the $99.99 bag for as little as $20.65 with Free Shipping. Y'all, That is a great deal! 

Check out the clearance section while you are over at Cricut, they have a selection of Cuttlebug embossing folders for super cheap, less than $1! Supplies are dwindling fast. 

Thanks again for subscribing to Paper Crafting On a Dime. 
Happy Crafting Y'all! 


Exciting News Friends!

I am happy to announce that I have been selected as a design team member for KoalaTCrafts, home of YouTube paper craft tutorial guru, Jen Evers.  Jen shares ideas simplified techniques for crafters from beginner to advanced in weekly livestream videos every Thursday 6pm and Sunday 2pm (CST).  Her 5 minute card series is hilarious and posts every Wednesday; you never know what will come of it but you can be sure it will be fun and inspirational.     https://goo.gl/xMrfb0
Beginning in July 2017, Jen's KoalaTCrafts blog will host a monthly challenge complete with prizes. Click the link to see what has been going on over there.     http://jenskoalatcrafts.blogspot.com

Sneak Peek for whats coming in July! 
I am thrilled to get a chance to work with a great group of talented crafters as we kick off the challenges with our July sponsor, Sherri Baldy My Besties. I've been a fan of Sherri's work for some time and use her digis for pocket letters, cards and other projects. They are so stinkin' cute! Check out the My Besties blog to see the newest Besties, Star Children, Mermaids, Trolls, Birthstone Besties and more! http://sherribaldy.blogspot.com


Here is one of the fun projects I've made with My Besties.

This ATC was created using the Santa's Helpers Besties Pocket Letter printable that comes with 8 different panels in full color. I printed this darling 3 times and fussy cut the Bestie twice to help give her some dimension. Her hat, bow and fur trim are thickened up using 2 layers of white paper laminated to the print using Art Glitter Glue and then popped up on foam tape for added dimension. The white fur is also glittered with Wink of Stella for some added shine. The Christmas the bulbs are coated with Stickles for shine. 

I hope you will join me and the KoalaTCrafts design team  at http://jenskoalatcrafts.blogspot.com beginning July1st for The announcement of the challenge theme.  

Happy Crafting Y'all 

Thrifty 101

There are lots of ways to shop the deals and / or use coupons to save money on supplies. This is a given and thrify crafters know to search for a coupon, or coupon code, before any purchase at Michael's, JoAnns, Hobby Lobby, Blitsy.com or Scrapbook.com. It is also a good idea to check Amazon, Ebay, Etsy and Facebook sales groups before you buy.  Bottom line, that still requires spending money. Some days you are not going to get away from that, especially for things like tools and adhesives or specific designer papers. 

Today, we are going explore what you can do for FREE. This is ultimately a recycle & reuse post; some ideas may not be new to you. Hopefully, this is at least a reminder to use what you have and save where you can so that you can spend where you must.


Chipboard 
I do not buy any chipboard. Use boxes from pantry items and other packaging cut down to size for your projects. ATCs. Flip Books, Junk Journal Covers and more can be made with these as the base. The cover the right started as a cracker box that I painted the edges black before adding decorative paper. If you are going for a craft look, glue 2 pieces together so writing is no longer visible. This also works if you need a sturdier bad, advised when making a larger project. TIP ~ Cut your pieces and dry fit before glueing for best results. 


Acetate
Save Acetate from packaging to make shakers or tags. The tag to the right was made with clear plastic packaging, hole punched for ribbon and made the perfect Washi sample spot for this project. 


Paper

Ok, some paper. Recycle brown paper bags and any paper bags and tissue from retailers you visit. Some have fabulous colors and patterns, others great texture or glass finish. Use them! Cut around the logos / printed portioned you have paper.  Wrapping paper and gift bags can be given a second, or third life with this technique as well. 
TIP ~ If you glue the printed sides of brown paper bags together, you have a heavier paper that can go through an embossing folder without tearing in most cases. The photo in the middle was made with this technique and then painted with gelato and selectively heat embossed.


Embellishments 
Use scraps with logos or writing and 'laminate' them print side together to create embellishments. Carefully cut a shape from your scraps and glue 5 or more together for a chipboard embellishment.  In the heart example to the right, the top layer was selectively embossed using an embossing folder then glued to the stack. It was then painted white, edges inked and the embossed area was misted with pink shimmer.  This techniques works very well for Hearts, Circles, Flowers and other simple shapes or items that can be die cut.  

TIP ~ Save those scraps for mixed media! Mist paper with water, crumple for texture and glue to base for dimension. This moves easily and can be built up. Once dry, mist with paint or inks for color. 

The ATC base above was made using a recycled playing card covered by wash samples and scrap paper cut with decorative edge scissors. TIP ~ Use old game pieces, cards, etc in your crafting. Playing cards can be purchased 2 packs for $1 at Dollar Tree. 

Other items to recycle into your paper crafting supplies:
Toilet paper and paper towel tubes
Decorative envelopes
Maps, brochures and other travel propaganda
Book Pages
Return mail envelopes from your monthly bills
Bubble wrap (for mixed media projects OR wrapping)
Clear plastic from stickers, paper and stamp sets .... *post coming soon on this*
Jars to use as containers in your craft room


I hope this post inspired you to expand your craft supplies with items you have on hand.
Please share your ideas in the comments below.

Happy Crafting Y'all!


Creating Backgrounds

One of the things I love about paper is the versatility of it. I love texture and color and shimmer but I find that when I buy the pretty paper, I have a hard time using it. Isn't there a saying that crafters are hoarders in disguise?

To solve this, 'I can't use it, I may need it later' issue, and to save money, I started creating my own background paper on solid cardstock. I generally use 65# Recollections brand from Michael's because it is inexpensive and consistent in quality. I do not advise this weight for card bases or flip book construction as it will not hold up to wear and tear as well as 110#. However, it works beautifully for adding to a base or as a Pocket Letter insert. NOTE ~ I also use The Paper Studio line from Hobby Lobby though I find this paper to be softer and tears easily.

I use distress inks and oxides, gelatos, watercolors, shimmer sprays, stamped images, embossing folders, stencils and embossing powder or glitters to create backgrounds. Below is a sampling of recent backgrounds I have created.


Photos ~ Flipbooks, Pocket Pals & Stuffed Envelopes


Add caption


Photos ~ Tags and Clips


BlueMoonScrapbooking

BlueMoonScrapbooking showcases the newest and best scrapbooking companies, Basic Grey, Tim Holtz, 7gypsies, Tattered Angels, Webster's Pages, Graphic 45 and MORE! We showcase the products with VIDEO and offer FREE Shipping for orders over $50.00.

Featured Post

Memory Dex Digital Cut Files

Read about my Etsy Shop  HERE .  Hello my crafty friends! I have been busy working on new designs and templates and cut files to sha...

About Me

I'm a Texas mom of adult kids who has been playing with paper my entire life. I love to create! What's more, I find that I am overall a happier person when I spend time creating things. Be it Art, Food or Decorations. I am an event coordinator by profession and have used my skills to create elaborate room designs, tablescapes, invitations and favors for weddings, parties of every occasion, fundraisers and corporate events. I create jewelry, stained glass and paintings but mostly, I love paper! Many of my projects are for others as gifts or swaps with other creative people I am blessed to call friends. I use tools to create pattern paper and embellishments to get the most bang for my buck. In my blog, I share my creations along with tips, tricks, techniques and tools used to get specific effects.