Showing posts with label DIY. Show all posts

Making the Cut - Machines & Mats

Hello my crafty friends!  
I know we love our cutting machines and all they allow us to do with ease. Most of the time! That is, when it cuts right and your paper stays put.  Many issues we face are due to the same underlying cause, the mats! Replacement mats are expensive and sometimes, unnecessary. Lets talk about that dreaded mat maintenance and quick, easy & budget friendly DIY solutions.
 
These tips are for Circut, Brother Scan-n-Cut and have been reported to work on other sticky cutting mats.  

When you first get your mat, lightly touch it all over with either a t-shirt or denim to let some of the intense stickiness get nocked down prior to the first cut,  this will help your paper not tear when you want it off the mat. NOTE - if you are purposely using a strong hold  mat, you bought that mat for the strong hold properties and you should disregard this tip!  Use the plastic mat cover when not in use, every time on any cutting mat you have. 

After several uses, when the mat is getting visibly covered with paper remnants, it si time to do a little light mat maintenance. First try to remove the paper bits with the Circut scraper. Lightly, remember that the goal is too remove the paper not the glue residue. Don't have a circuit scraper? Use an old gift or credit card or one of those promotional cards that come in the junk mail. Wipe the edges of the card every few swipes.  Next, with your mat of a flat surface, wipe it down with a baby wipe. You may need to scrub in some areas but you will see the residue coming off. The goal is to remove the fuzzy remnants and reactivate the sticky glue.  Let this dry completely before using again.  **Baby wipe, not bleach cleaning wipe!**

After many uses and repeated baby wipe cleanups, it may be time to re-stick the mat. This is surprisingly easy to do and cost effective. How to tell its time? If you can stick your hand to the mat and pick it up without the mat lifting, it is past time. If your paper wont stay put when cutting, it is past time. 

Clean it up as noted above and allow to dry.  Re-stick the mat with Zig 2 way glue. I do not cover the entire mat. I do all edges and a line in the center of the 2nd inch all around. Then I use ever 2 or 3 lines in both directions following the grid pattern. A little goes a long way. The glue goes on blue and drys clear;  a light layer is all you need to use. Let it completely dry before use. Once dry, use a t-shirt or denim to lightly touch the mat too and let it be a little less sticky, This will keep your images from tearing. Use as if the mat was new. 

If you have cut through your mat in places, put packing tape on the back of the mat wherever it has been cut. This helps keep further damage from occurring and will extend the life of the mat.  

If you have previously washed, scrubbed or scraped all of the glue from your mat, you may need to wash it (use Dawn to get all of the residue off) and allow it to completely dry for these tips to be effective. Still a better option than the cost of the new mat IMHO.  

Budget Gesso Recipe

Hey Crafty Friends! 

I am the Design Team Coordinator for Jen Evers and KoalaTCrafts. Jen recently shared a technique making DIY Washi tape and then, in part 2, we used the tape to create some quick cards. There were lots of questions about Gesso in that live session so I wanted to share my budget friendly DIY recipe and some tips.


You can see the video HERE 


What is Gesso and how do you use it? 
Gesso is thinner than paint, it dries hard, making a surface more stiff.  Think of gesso as a primer. It is a first layer. It is commonly used on canvas to give the surface texture and the paint something to adhere to. Without it, paint soaks into the weave of the canvas and it is difficult to get consistent results.  Jen applied a thin layer of gesso to Masking Tape for the purpose of the project in the video. It can also be applied to surfaces such as canvas, paper, chipboard, vinyl records, wood, and others prepping them to accept acrylic paint, ink, watercolor, or even marker. 

Apply & Let it Dry! 
You can use a heat tool to speed this process along, being mindful your original surface and how reacts to heat.  It is better to use thin layers. For something thin and less porous, like masking tape, a single thin layer is enough to give the paint a nice foundation to stick to. 

When prepping canvas or large surface for painting, make sure it is clean and free of dirt and oil. Alcohol on a rag or paper towel for a quick wipe down is generally sufficient; you don't want the surface to be wet with alcohol, use a light touch.   Apply a thin layer of gesso to your surface working in all one direction, vertical or horizontal, and allow this layer to dry. Apply a 2nd layer going the opposite direction and allow it to dry. You can lightly sand between layers for a smoother surface, or you can go over the area multiple times with layers of gesso to add extra texture, this is common in multi media projects.  * TIP *  Make it a thicker consistency with less water to use as a texture paste. This works well in thin layers applied with an old gift card over stencils. Wash your stencils, brushes and tools after applying and before it dries!  I keep a wash tub filled with a small amount of water (maybe 2 inches) on my craft table to pop my tools into as I'm working with any texture paste.

There are many brands of Gesso avail be to buy at art supply stores and it generally comes in White, Back or Clear.

Here is my quick and easy, dollar store DIY Gesso Recipe:

1/2 Cup Baby Powder
4 Tablespoons School Glue 2 Tablespoon Acrylic Paint
2 Tablespoon Water (I use bottled)

Add water slowly stirring well with a wooden craft stick or plastic knife as you go to avoid lumps.

I mix and store my gesso and texture pastes in a plastic or glass container with an airtight lid. 

You can increase the quantity for large projects, adding the water slowly to get the consistency that is right for you.  White or Black is most common for the Paint choice as it will tint the Gesso, you can mix up white and add any color paint if you want to have a specific color background.  Keep in mind the darker you go with the gesso color, the more paint it takes to cover.

My Shimmer Spray DIY Recipe can be found HERE

Happy Crafting Y'all! 

Now Open ~ ETSY!

Hello Crafty Friends! 
It has been a crazy summer full of incredible challenges and changes.  I don't know where this path is going but I am determined to make the very best of it along the way. 

In that spirit, I have opened an Etsy shop with paper crafting supplies for US crafters who want to play but maybe don't want to invest in the tools and machines or designing at the moment. 

My first items up for sale are are Memory Dex card supplies  There are many shapes, overlays and layered pieces to choose from in your choice of colors and more coming soon. What's in store? Embossed A2 and ATC card fronts, stamped images, die cuts and more fun memory dex shapes!  

Check out the selection and let me know what you think PaperCraftingOnADime. Custom orders, colors & quantities are available. 
Happy Crafting Y'all! 

Quick & Easy 10 Minute Craft Project

[Koala+T+Clothespin-3%5B5%5D]


Somedays you just need things to be easy! 
My friend and fellow KoalaTCrafts DT member Sharon Cameron, One Crafty MRS from Piece-OfHeart created this 10 minute craft using our adorable new mascot dig from KoalaTCrafts, available in a few variations and you can opt for a full color version if you wanted something even faster. Jen Evers has done an outstanding job on these digis with so many new releases there is sure to be something you will love.   

Enter in my discount code at checkout MICHELLE for 10% off your total purchase. 
Click this LINK for full instructions on making this Koala T Clip! 

Digital downloads can be the perfect tool for a crafty girl on a budget. Bundle packs make that even more of a savings.  For more info on Digis, check out this Blog Post.

Happy Crafting Y'all! 

Dimensional Dots on a Budget

KoalaTCrafts August Challenge entry by One Crafty Mrs

I love dots! I also love texture and dimension. These little touches can help transform a simple project into a WOW with very little effort. 

I see this a lot lately with sequins and drops of Stickles but those are relatively flat elements. Dimensional dots are another way to achieve this. There are many products out there to choose from, enamel dots and Nuevo drops are the most popular. I find both the be a little pricey and have some other drawbacks, color being the biggest one! Now, I am a fan of Black, White or Clear Glitter, Silver and Gold so it is easy for me to narrow down what to purchase instead of feeling like I need an entire line of a product. Thing is, I already use these colors a lot in my projects and sometimes I need a color accent to set things off. When I am trying to use a color, like Hot Pink or Aqua, I find it difficult to find products that match my paper, ink, markers, paint or other elements. That is where this tip comes into play.  Use Hot Glue to create your dots and then color them to match your project. You get the size of the dot you want, or multiple sizes and exactly the color you need it to be with very little drying time.  My friend and Fellow DT member Sharon Cameron, One Crafty Mrs, wrote an easy to follow process blog with side by side comparison of different mediums so you can know what to expect.  Check out her post here HERE.


The cupcake image and sentiments Sharon used to create this card come from our KoalaTCrafts Challenge #2 sponsor for August, Graciellie Design. Use coupon code SUMMER 2017 for 40% off most items in her Esty Shop. 


Easy DIY Envelopes ~ No Punch Board Needed

I know many of you see the punch boards and the traceable patterns and even the scoreboard tutorial videos for creating envelopes and wonder if it is a worthwhile investment.  Sometimes purchasing card / envelope base kits from the big box store with a coupon is the better option because those tools can be expensive and are not always practical. Even so, they still cost more than a 50 pack of card stock, which will create 100 card bases! 

I am here to tell you that you can make envelopes with printer paper, a ruler, scissors, the tools you were born with and your favorite adhesive faster than you can get put the punchboard, read the directions and prep your paper. By using printer paper, you can print free digital patters or stamp the envelope to perfectly match your card.  This works for any size and shape of card you care to create; A2, Square, Circle, Animal, or other odd shape. It's affordable and oh so easy! 


Check out my blog post at  KoalaTCrafts  for instructions and links to the video tutorial.  It's quick and easy!

Use pattern paper for a decorated look with not extra effort required.


Happy Cafting Y'all! 

Join the My Besties Challenge


I am so excited to be a part of the KoalaTCrafts July Design Challenge sponsored by My Besties.

I love these digital prints of cute big eyed Besties, Twinkle Toe Trolls, Star Children and more. I print multiple copies to fussy cut any layer to make cute 3D cuties that I often use on cards and pocket letters. 

The Challenge theme is any creation you like that includes the color Red or Blue or Stars. 

There will be 2 winners, picked at Random, and announced August 1st. The Design Team is also voting on an Honorable Mention project to be featured on Jen's blog.  


Click below for full details and to enter your project by July 31st.  

Head over to www.mybestiesshop.com to see the amazing selection of Besties Sherri Baldy has to offer. During July, save 50% off most digital items with the code YOURSPECIAL50


Twinkle Toe TROLLS 25


This precious My Besties Twinkle Toe Troll was my entry for the July Design Team Challenge. She was inspired by a special little cutie turning 6 with a July birthday who happens to LOVE the color red!  

I will have a process post coming soon for the background effect.  

Happy Crafting Y'all! 


Shimmer Spray Recipe


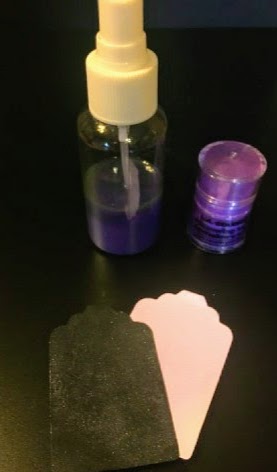
I like to alter paper. Many of my projects end up being mixed media even if I don't plan that when I start out. When things are not turning out how I hoped, or like, I try to follow the advice of the well known designers and just keep going. Often, I find myself grabbing the glimmer mist. Being the budget crafters that I am, I always look to pick these beauties up at a discount. No one wants to pay $4.99 for a 2 oz bottle that you will run-through in a month if you are shimmer crazy like me.  You can often find them at Tuesday Morning for half price, but that is hit or miss and recently, they have been carrying multipacks that include colors that I either have or just do not care for. DIY to the rescue!  Below is my Dollar Store recipe that I have made in many colors with great success. 


$10 worth of ingredients from Dollar Tree will create 6 colors off glimmer with enough left over to make 
a 2nd batch.  If you are not sure of how much you will use of any specific color, use less mica and alcohol. 

Ingredients:                                               
Alcohol *see notes
Bottled water *see notes
Mica - L.A. Colors eyeshadow
Liquid hairspray
Spray bottle *see notes
Glycerine **optional / drugstore
Acrylic paint **optional
*NOTES:  use 70% alcohol undiluted or 90% alcohol 
with a 60 alcohol to 40 water ratio. Dollar Tree Alcohol 
is 50% concentrate, DO NOT ADD WATER! 


Eyeshadow - Snow White for pearl on any surface. Sunshine = gold. Play with colors to find combinations that you like.  Use any shimmer eyeshadow with mica as 1st ingredient.  


Spray bottles ... You can buy travel bottle set OR a body spray bottle for same price. Depends on how much you want to make. Dump the body spray and rinse; do not wash with soap!  It may still smell so pick something you like. Trim the tube at an angle so that it is not touching bottom of bottle.


INSTRUCTIONS:
  • Remove eyeshadow brush and tap mica into bottom of the lid. Be patient, this takes a couple of minutes. Measure 1/4tsp mica and add to travel size bottle. The Dollar Tree bottles are 2.7oz. 
  • Add 1 TBSP liquid hairspray, swirl to combine. This is a binder and keeps the mica from flaking off when dry. 
  • Add alcohol until bottle is 3/4 full.
  • OPTIONAL Add 3 drops glycerine for travel bottle. It helps with flow but increases drying time.
  • Shake well without spray tube, use the solid cap or otherwise cover the opening. 
  • TEST on white paper. Add more mica as desired. 
  • If happy with shimmer color, add sprayer and cap. I recommend labeling with the color of eyeshadow used for future reference. 


Paint + Mica = Opaque color shimmer 
SWIRL! Do Not Shake to keep sprayer from getting clogged. Do this each time for best results. The mica will settle.     ----->>>


Pearl + White Paint


OPTIONAL 
If you want a colored spray with a pearl glimmer, add 5 drops of acrylic paint. 
This will give you an opaque base color. Use ink for translucent color.
Leave out paint or ink for shimmer only. 
The samples below were created using only mica.

Snow White adds a pearl shine to any project.  

Sunshine add Gold shimmer
Lollipop is a vibrant Pink
1/2 tsp mica was used here
Gape Jelly adds a subtle Purple shine
Radiant is a Copper shimmer

Use mica eyeshadow to create shimmer sprays


BlueMoonScrapbooking

BlueMoonScrapbooking showcases the newest and best scrapbooking companies, Basic Grey, Tim Holtz, 7gypsies, Tattered Angels, Webster's Pages, Graphic 45 and MORE! We showcase the products with VIDEO and offer FREE Shipping for orders over $50.00.

Featured Post

Memory Dex Digital Cut Files

Read about my Etsy Shop  HERE .  Hello my crafty friends! I have been busy working on new designs and templates and cut files to sha...

About Me

I'm a Texas mom of adult kids who has been playing with paper my entire life. I love to create! What's more, I find that I am overall a happier person when I spend time creating things. Be it Art, Food or Decorations. I am an event coordinator by profession and have used my skills to create elaborate room designs, tablescapes, invitations and favors for weddings, parties of every occasion, fundraisers and corporate events. I create jewelry, stained glass and paintings but mostly, I love paper! Many of my projects are for others as gifts or swaps with other creative people I am blessed to call friends. I use tools to create pattern paper and embellishments to get the most bang for my buck. In my blog, I share my creations along with tips, tricks, techniques and tools used to get specific effects.